Step 1: Pick
up stitches
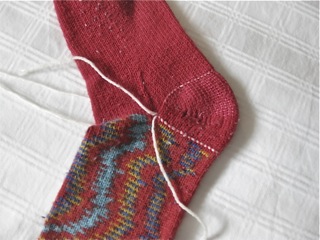
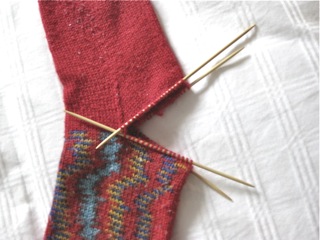
Begin by picking up stitches where
the heel begins and across the instep.
My sock leg is usually 64 stitches,
that means I have 32 stitches for the
heel. I pick up 32 stitches at the heel,
and 46 (7 + 32 + 7 which includes the
gusset on each side) for the instep.
I use a darning needle and contrasting
colour yarn.
I slip
just one side of the stitch onto my
needle being careful to stay in the
same row. I use a separate piece of
yarn for the instep—that makes
it easier to pull out the yarn once
I have the stitches on my needles.
Step 2: Cut Out The Old Damaged
Heel
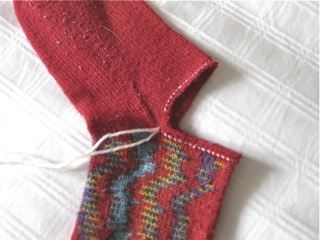
Cut out the damaged heel—I leave a
couple of rows extra so I don't
accidentally cut the stitches on the
carrying threads.
Step 3: Unravel extra rows
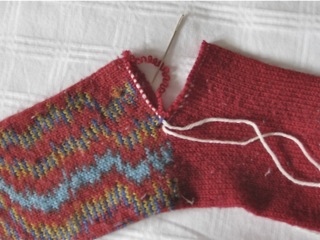
Using a darning needle, carefully unravel
the extra rows. This can be a bit time
consuming because the yarn may be matted
on the inside, and you may have cut
across rows. But eventually you'll get
down to the stitches on the carrying
threads. Be sure to leave yourself a
tail of yarn at least 6 inches in
length from the unravelling where it
meets the stitches on the carrying yarn—you'll
need to
weave that into the back of the sock
when you're done.
Step 4: Pick up heel stitches
on needle
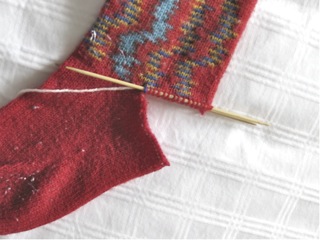
I use fairly short dp needles, but
you can use a circular needle. I pick
up half the stitches (16) on one needle
and the rest (16) on a second.
Step 5: Pick up instep stitches
Now I pick up the stitches from the
instep, 23 on one needle, 23 on a second.
Step 6: Knit the heel flap
At this point, I put the heel stitches
on one needle. I knit what's called "an
eclectic heel." I prefer it to
the standard “knit
1, skip 1” technique because
I like how smooth this one is. It’s
done by knitting “short
rows”.
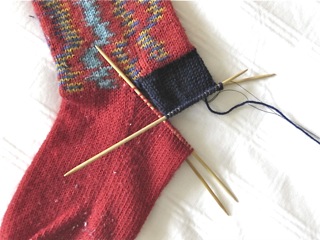
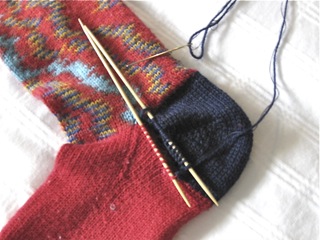
Start by knitting the heel flap—I knit
across all 32 stitches, turn the sock,
purl back across the 32 stitches. I
do this 7 times until I have a heel
flap (a total of 14 rows).
Here I'm
using a contrasting colour yarn for
the new heel, but obviously you can
use whatever colour yarn you wish.
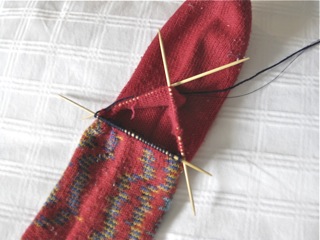
Step 7: Turn the heel
Once I have 14 rows I
start to turn the heel. Knit 2/3 of
the heel stitches (I have 32 stitches
on my needle so I knit over 21) turn
the work and purl back 1/3 (in my case
I purl back 11 stitches). At the end
of each subsequent row I pick up one
stitch and turn; eventually I have all
the stitches I began with on the needle.
Then I pick up 7 stitches along one
side of the flap, knit the 32
stitches for the front of the foot,
then pick up another 7 stitches on
the other side of the flap (These
7 stitches on each side of the heel
form the heel gusset).
Here are the original detailed instructions:
http://lupinworks.com/eclecticHeel
(My modifications are in red.)
Step 8: Grafting the heel to the instep
Now you're ready to attach the remade
heel to the instep of the sock. I use
what's called a "3-needle
castoff"
or the "kitchener" stitch.
(Here
are detailed instructions with photos
for doing the grafting stitch) I
start with half my heel stitches on
one needle, half on the other. Same
with the instep.
Having all the heel and instep stitches
on a single needle is too difficult
because you have no way to flex your
work.
Hold the needles parallel with the
tips pointing in the same direction
and the wrong (purl) sides facing inwards.
First you need to "set up" for
grafting by performing the following
two steps one time: Insert the threaded
tapestry needle into the first stitch
on the needle closest to you as if
to purl and pull it through, leaving
the stitch on the needle. Then insert
the needle into the first stitch on
the back needle as if to knit, leaving
the stitch on the needle. Pull the
yarn through. These first two steps
are preparatory and are only done
once.
The following four
steps are the ones you will repeat until
you've worked every stitch on the needles.
I usually chant to myself "knit,
purl—purl, knit" while
grafting and you'll soon see why.
Step 1
Insert the needle into the first stitch
on the front needle as if to knit,
while slipping it off the end of the
needle.
Step 2
Insert the needle into the next stitch
on the front needle as if to purl,
but this time, leave it on the needle.
Gently pull the yarn through.
Step 3
Insert the needle into the first stitch
on the back needle as if to purl,
and slip it off the end of the needle.
Step 4
Insert the needle into the next stitch
on the back needle as if to knit,
and leave it on the needle. Pull the
yarn through.
Repeat steps 1-4 over and over again.
After you've worked a couple of inches,
pause [being sure to complete step 4
so you'll know where to begin again]
and tighten up the stitches using the
end of the tapestry needle to tug at
each loose loop in turn, working from
the beginning of the join towards the
last stitches worked. I find I get a
nicer final result when I pull the yarn
lightly through the stitches during
the process of grafting and then adjust
the tension on the yarn to match the
gauge of the knitting as closely as
possible afterwards.
Keep repeating steps 1-4, pausing to
tighten up the stitches now and then
until all the stitches are worked.
Step 9: The Finished Heel
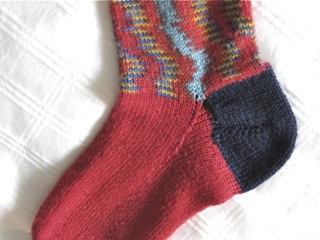
Turn your work inside out and weave
in all yarn ends.
Remove all lint, pilling, fuzzy yarn spots
from the sock—I use a garment shaver
and a roll of sticky tape.
And you now
have a new sock.

By the way, if you're interested in
sock heels here's a comprehensive description
of the various ways to knit a sock heel:
http://www.woolworks.org/sockheels.html
If that link doesn't work, try here:
http://www.lupinworks.com/knitting/heel/heelTypes.html |