The Magical Magic Loop
Sep 16, 2009 by Kathleen Cubley
Original URL: http://www.knittingdaily.com/blogs/daily/archive/2009/09/16/the-magical-magic-loop.aspx
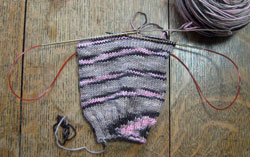 I started knitting circular objects—socks, gloves, mittens, hats, and so on—on double-pointed needles (DPNs). While I enjoyed knitting the pattern, I didn't particularly like the finished object because I always ended up with ladders where I switched from one needle to the next. I guess I wasn't knitting those stitches tight enough, but as much as I tried to tighten them, the ladders remained. And who likes to think about tightening stitches all the time, anyway?
Because of this problem, I simply didn't do as many "tube projects" as I wanted to.
Enter the Magic Loop! I was at my LYS one Saturday afternoon and I saw a gal knitting a sock on the oddest looking contraption with loops sticking out of each end of the knitted sock. I asked her about it and she said she was using the Magic Loop method—which uses just one, long circular needle. I quickly found a class on this technique, thinking that I might enjoy it more than DPNs. I was right—the Magic Loop brought me back to sock knitting!
Now I use this method for almost all of my small, circular knitting projects. I also teach it when I teach sock classes. The students get two classes, really: sock knitting and the Magic Loop technique!
And Now, a Lesson for You
Most people really take to the Magic Loop method, so I thought I'd share a lesson with you, too. It just takes a few rounds to become familiar with the process and by the time you're halfway through the leg of a sock, you'll be a pro.
I recommend at least a 32-inch circular needle for socks and a 40-inch needle for hats, baby sweaters, and other larger-circumference projects. (The neat thing about using the Magic Loop for hats is that you don't need to change to DPNs to finish the crown.)
A Note About Circular Needles: Your knitting life will be so much easier if you relax the cable of your circular needle before you begin knitting. I do this by microwaving a large mug of water for a couple minutes, dipping the cable into the hot water for about 30 seconds, and then straightening it out and running it under cold water for a few seconds until it's cool. You can also steam the cable, or if you're using a metal needle, you can boil a little water in a skillet and put the whole thing in. It's amazing to watch it loosen up! Be sure and use hot pads or tongs, though, because that metal gets hot!
Here we go, step by step!
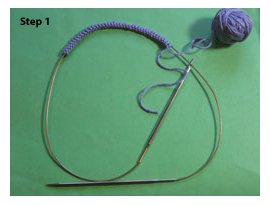
Step 1
On a circular needle at least 32 inches long, cast on the required number of stitches (I've cast on 40 stitches). Slide the stitches onto the cable part of the needle.
Step 2
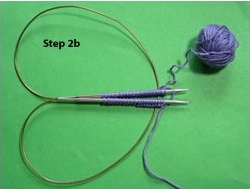
Hold the needle so that your working yarn (and tail) is to your right. Bend the left part of the needle toward you slightly (but don't put a crimp in it!), making sure the bend is halfway through the total number of stitches—so, if you've cast on 40, bend the cable between the 20th and 21st stitches (photo 2a). Grasp the cable and pull it out of the stitches until your stitches are on the needle portions of the circlular needle; you'll have half your stitches on one needle and half on the other needle (photo 2b).
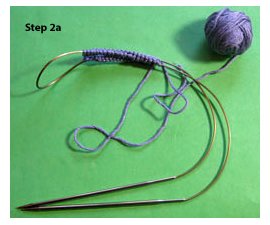
IMPORTANT TIP: Make sure that your working yarn is hanging off of the back needle. What's the back needle? If you hold your needles parallel to each other, the "front" needle is the one nearest you and the "back" needle is the one farthest from you. If your yarn is hanging off your front needle, slide your stitches back onto the cable and divide them again, this time making sure the working yarn ends up at the back. If you start with your working yarn and tail to your right and bend the left end of the cable needle towards you, your working yarn should end up on the correct needle.
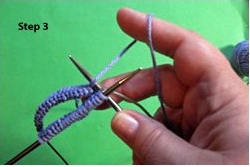
Step 3
Make sure your stitches aren't twisted: all of the stitches should be "hanging" downward; the cast-on edge sits at the top of the needle. (Some people like to place a marker to mark the beginning of the round, but I just use the yarn tail as my marker.) Slide the stitches on the back needle to the cable part of the needle, thereby freeing up the back needle. This back needle is now your right-hand needle—you'll be knitting onto it just as if you were using straight needles (photo 3).
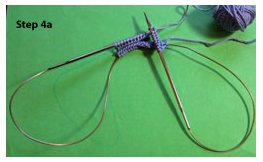
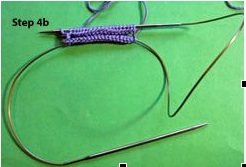
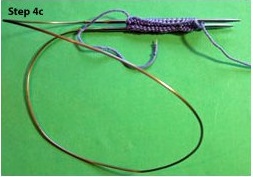
Step 4
Knit the stitches on your first needle (photo 4a). When you've knit to the end of the needle, you've knitted half a round (photo 4b, and in this photo the back needle is the needle showing on the bottom). Turn the needles so both tips are pointed to the right and slide the now-front needle into the stitches that are on the cable (photo 4c).
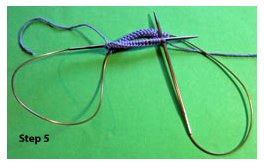
Step 5
Slide the now-back needle out of the stitches that you just knit so that those stitches end up on the cable. You're now ready to knit the second half of the round.
And that's it! You keep switching sides, pushing the stitches on the cable onto the front needle, and pulling the back needle out of the previously knit stitches. Remember that you need to knit both sides of the work to complete one round.
Some Pattern Ideas
I'm recommending three sock patterns here and one sock and mitt pattern. These are lovely patterns in general, but also good patterns for practicing your Magic Loop technique. Once you're two to four inches into one of these projects, you'll be Magic Looping without even thinking about it.
His and Hers Socks by Ann Budd. This is a good advanced-beginner project, with options for men's and women's socks. Ann Budd is a sock pro, so you'll be happy with any pattern by her, but because of the two versions this one is particularly valuable.
Knotty or Knice Socks by Chrissy Gardiner. This is an intermediate, toe-up sock pattern. I love the twisted stitch pattern on these socks—it's a Bavarian pattern but it almost looks Celtic to me. The Magic Loop works equally well with top-down socks and toe-up socks.
Rustic Ruffled Socks and Mitts by Ann Budd. This is also a toe-up pattern, with the added challenge of short-row heels (these heels are easy, really, and fun to work). You'll get a nice, simple sock pattern with a touch of romance in the ruffle, as well as a simple but useful mitt pattern. Who wouldn't like a set of these?
Comfy Socks by the Knitscene Design Team. This is an easy, free pattern knit from bulky-weight yarn (it's also one of 5 free patterns in our free downloadable eBook, 5 Free Sock Knitting Patterns). These socks are perfect for fall lounge-around-the-house-days. And they knit up really quickly, too!
Have fun practicing your Magic Loop technique!
Cheers,
Kathleen
P.S. Special thanks to Sarah Hauschka, who invented the Magic Loop method, and to Bev Galeskas and Fiber Trends, who published the first book on the subject.