You will need:
- Kraft paper
- glue or scotch tape
- tape measure
- compass
- approx.
1 yd. of Pellon ® fleece interfacing, 45" wide
I used 1/2 m. fusible drapery stiffining
- 60"+
wide
- approx. 1 1/2 yds. of bottom-weight or upholstery fashion
fabric, 54"- 60" wide
I used 1/2 m. of two different batik
fabrics (batik is a bit stiff) each was 44" wide
- approx. 1/2 yd. of lining fabric, 45" wide
I didn't use any lining fabric
- approx. 3/4 yd. of grosgrain ribbon, 2" wide
I didn't use any grosgrain ribbon - instead, I made the
hat reversible
- coordinating thread
MEASUREMENTS
Begin by measuring the circumference of your head. Wrap the tape measure around the back of the head, over the ears, and high up on the forehead. For most people, this will be approximately 22 ½ inches. Add 1 to your head measurement. This is the head fitting measurement (This number may vary due to hairstyles as well. Most people will pull back the hair or put it in an up-do to wear the hat properly.)
My head measurement was 21.75"
Next, you need to determine the radius (R) you will use to create a circle.
Use the formula, C = 2 ? R, where ? = 3.14
Eg. 23.5 = 2 x 3.14 x R
R = 23.5 divided by 6.28
R = 3.75
For a head fitting measurement of 23 ½, you need a radius of 3 ¾.
I used a radius of 3.5"
PATTERN
CROWN
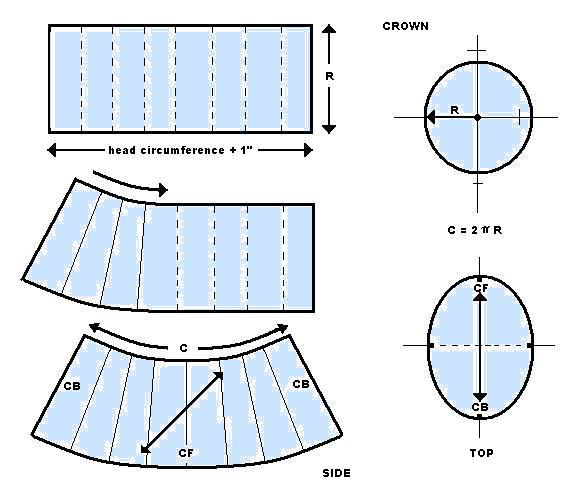
Draw a rectangle equal to the head fitting measurement X the radius amount.
Divide the rectangle into 8 equal parts.
Slash each line from the top of the rectangle to almost the bottom edge.
Overlap each section left of center by ½ at the top to nil at the bottom and glue down.
Repeat for each section right of center.
Trace this new shape onto a new sheet of paper and blend the curved topline smooth.
Add ½ seam allowance around the perimeter. Label the 2 short ends, centerback (CB) and the centerline, centerfront (CF).
Draw a grainline 45 degrees to the center line. This is the side section of the crown.
Measure the new curved seam that you have created. Record this measurement.
Using the formula again, determine R for the top of the crown.
If you measure the circumference of the top section, it should equal the curved seam measurement of the side section.
(Adjustment Tip: Increasing or decreasing the circle by 1/8 all around will change the circumference by approximately ½).
Use a compass and draw a circle using the amount for the radius (R).
Divide the circle into quarters. At the top and bottom of the circle extend out ½. At the sides of the circle, reduce inwards by ½. Join these points with a smooth arc blending into each point to create an oval. Re-check the circumference of the oval. It should still equal that of the new curved seam on the side section.
Add ½ seam allowance to the circumference and draw a straight grainline from CF to CB. This is the crown top.
I tried the oval top for the crown and didn't
like how it looked - I used the circle for the top which looked
better.
BRIM
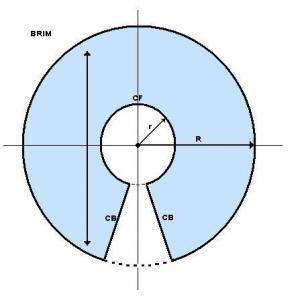
Fold a large piece of paper in half, then half again; open out flat.
Draw the 2 intersecting lines. Place a point in the center of the intersection.
Using a compass, draw a circle with a radius (r) based on the head fitting measurement plus 1.
From the same point, draw a second circle with a radius (R) equal to 3 times r.
This is the brim width. (You may increase the width of the outer edge if you desire).
The inner circle must equal the head fitting measurement. Starting at the top of the circle, measure half the head measurement to the left of center and repeat on the right of center. Mark a point at each interval. Square out from this point to the outer edges. Label these edges, CB. This is the interfacing pattern.
Trace this brim shape onto a new sheet of paper. Add ½ seam allowance all around the brim pattern. Draw a straight grainline parallel to the centerline. This is the upper and lower brim patterns.
I stitched the interfacing using a zig-zag
stitch and tried it on - I found the inner circle a bit snug so
I cut away 1/8" all around the inner circle (and removed the same
amount from the two brim fabric pieces (rather than redrafting the
whole pattern. I was able to ease in the crown just fine.
My seam allowances are all 1/4" - when
I was drafting the pieces I allowed for 1/4" seam allowances.
I use a 1/4" quilting foot to sew the seams. The 1/4"
is more than enough seam width and then you don't have to trim
or snip anything.
I added markings to each piece to remind me to snip
the CF, CB, and half way along the two sides - in other words,
I marked
the 1/4 markings so that I could match up the pieces when I assembled
the inner and outer hats.
CUTTING
Cut the crown side 1X; lining 1X (on bias
grain) I cut two - one from each fabric
Cut the crown top 1X; lining 1X (on
straight grain) I cut two - one from
each fabric
Cut the crown side interface 1X (on bias grain) Because
the batik is a bit stiff I didn't use any interfacing here
Cut the brim 2X (on straight grain)
Cut the brim interfacing 1X (on straight grain) I only
interfaced one side of the brim - it seems stiff enough, but you
could put interfacing on both sides if you want a very stiff brim.
Cut 1 strip of self bias 2 wide; length to equal outer edge
of brim + 2 (on bias grain) I
didn't use this because my hat is reversible.
ASSEMBLY
On each brim piece, pin and baste CB seam with right side together. Stitch seam using a ½ seam allowance and press open.
On the brim interface piece (Pellon ®), butt the two CB edges together and zigzag stitch it together.
Sandwich the interfacing between the two brim pieces with face sides up, lining up the CB seams. Baste together.
Do rows of topstitching parallel to the outer edge, ½” apart, starting from the inner edge. (I use the width of the presser foot as a spacer.) The more stitching you put, the stiffer the brim.
Bind the outer edge of the brim with the bias cut strip of self-fabric, beginning from the CB seam, folding in ½ to bind, and then turning under the end to encase the starting point. Press edge flat.
Baste the side interface to the wrong side of the side section.
With right sides together, pin and baste the CB seam. Stitch seam using a ½ seam allowance and press open. Grade seam allowances.
Divide top edge of crown side and the crown top into quarters. Match up these points, pin and basting with right sides together. Machine stitch the side section to the top of the crown, using a ½ seam allowance. Trim and grade the upper seam allowance and interfacing only.
Repeat the same procedure for the hat lining.
With wrong sides together, place lining into crown, aligning with CB seam and baste seam allowances together. Turn right side out.
Now, insert crown into center hole of brim. Match up CB seams and pin and baste crown to brim. Machine stitch using a ½ seam allowance. (Clip seam allowance if there is any buckling).
Sew in grosgrain ribbon as a sweatband. This should equal the head fitting measurement less the inch. Lay the ribbon on top of the seam allowance and edge stitch along the ribbon edge. Overlap at CB. Trim the seam allowance with pinking shears. Turn the ribbon up into the crown to conceal the raw edge of the seam allowance and tack to CB seam with hand stitching.
Here are my assembly instructions for making a reversible
hat:

1. Join CB seam on brim interfacing using a zig-zag
stitch to abut the edges.
2. Sew brim CB seam 1/4" seam allowance, press open.
Apply the interfacing to the wrong side of the brim fabric.
3. Sew CB seam on crown side, matching CF, CB and the two
side markings; 1/4" seam allowance. Press open.
4. Sew brim and crown side together matching CF, CB and
the two side markings; 1/4" seam allowance. Press seam toward
crown side.
5. Repeat steps 1-4 to construct the "inner hat".
6. Turn inner and outer hats inside out. Place wrong sides
of the crown tops together, align the back seams. Stitch the
two crown tops together within
the seam allowance.
7. Draw the outer hat crown down over inner
crown. Push inner brim to inside of crown, then stitch brim/crown
seams together
within the seam
allowance.
8. Lay inner and outer brim together (right sides out), press.
Stitch concentric
circles starting presser foot width from the crown/brim seam
and working toward the brim edge.
OR free-motion sew the two brims together.
9. You can use bias binding to trim the brim
edge OR cut seventy 1 1 /2" squares (half from
each fabric).
Alternating fabrics, fold each square in half along the diagonal,
place at the edge of the brim, pin in place. Overlap the squares
by about half the diagonal. Carefully stitch back and forth
over the squares to hold them in place, remove pins and stitch
several more times both sides of the brim to securely attach
the squares to the brim.